If you are a new writer on Medium, or an especially curious one like me, you probably have looked at ways to improve the formatting of your Medium articles.
Medium has published a couple articles on article formatting, but many are useless to new writers. These articles are typically outdated, lack proper visuals to demonstrate how to use various features, and even if there is quality information, it is usually distributed across a seemingly random array of articles.
I’ve addressed many of these formatting questions on my publication Blogging Guide, which is geared toward Medium writers looking for help. However, Medium article formatting can be overwhelming and this information should be broken down further with visuals to truly make it understandable to most writers. This was underscored by a response to a Medium-authored formatting guide, from Medium user,
:

This is just one of many (unanswered) comments made in response to Medium’s formatting guides, which are rich with information, but hard for new writers to decipher.
I tried to make this guide comprehensive enough that it would be useful to both new writers who want to explore all the formatting features Medium offers, and to veteran writers who think they know all the tricks but may have overlooked one or two more obscure ones.
I hope you enjoy the guide, and please be sure to follow the Blogging Guide Publication, subscribe to our newsletter, and join our Facebook group! We are Medium’s leading publication dedicated to publishing useful content for Medium writers.
Medium Text Toolbar Buttons


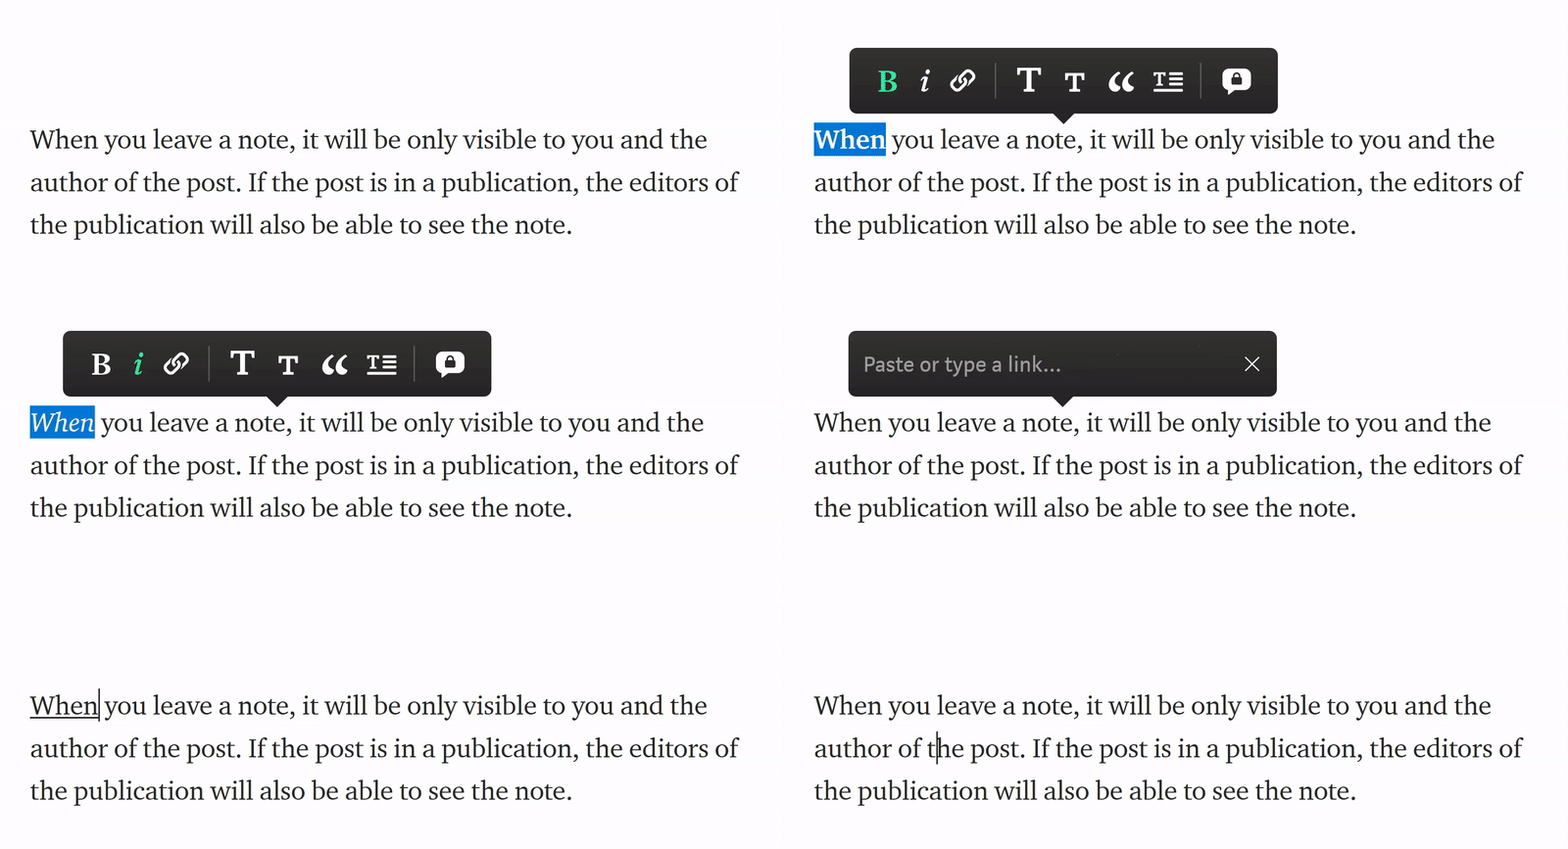
To format an article on Medium, select the text you want to format and choose the relevant option from the toolbar. Below you’ll find all the formatting options offered by the Medium editor. Animations are listed below each major topic.
Bold
Select the text you want to format to open the text toolbar and click the B button to apply the formatting.
Italics
Select the text you want to format to open the text toolbar and click the i button to apply the formatting.
Links
To create a hyperlink in your post, select the text you want to convert into a link to open the text toolbar, click on the chain icon in the toolbar to hyperlink the selected text, paste or type in a link, and press Enter.

Titles, Subtitles, Headers, and Subheaders
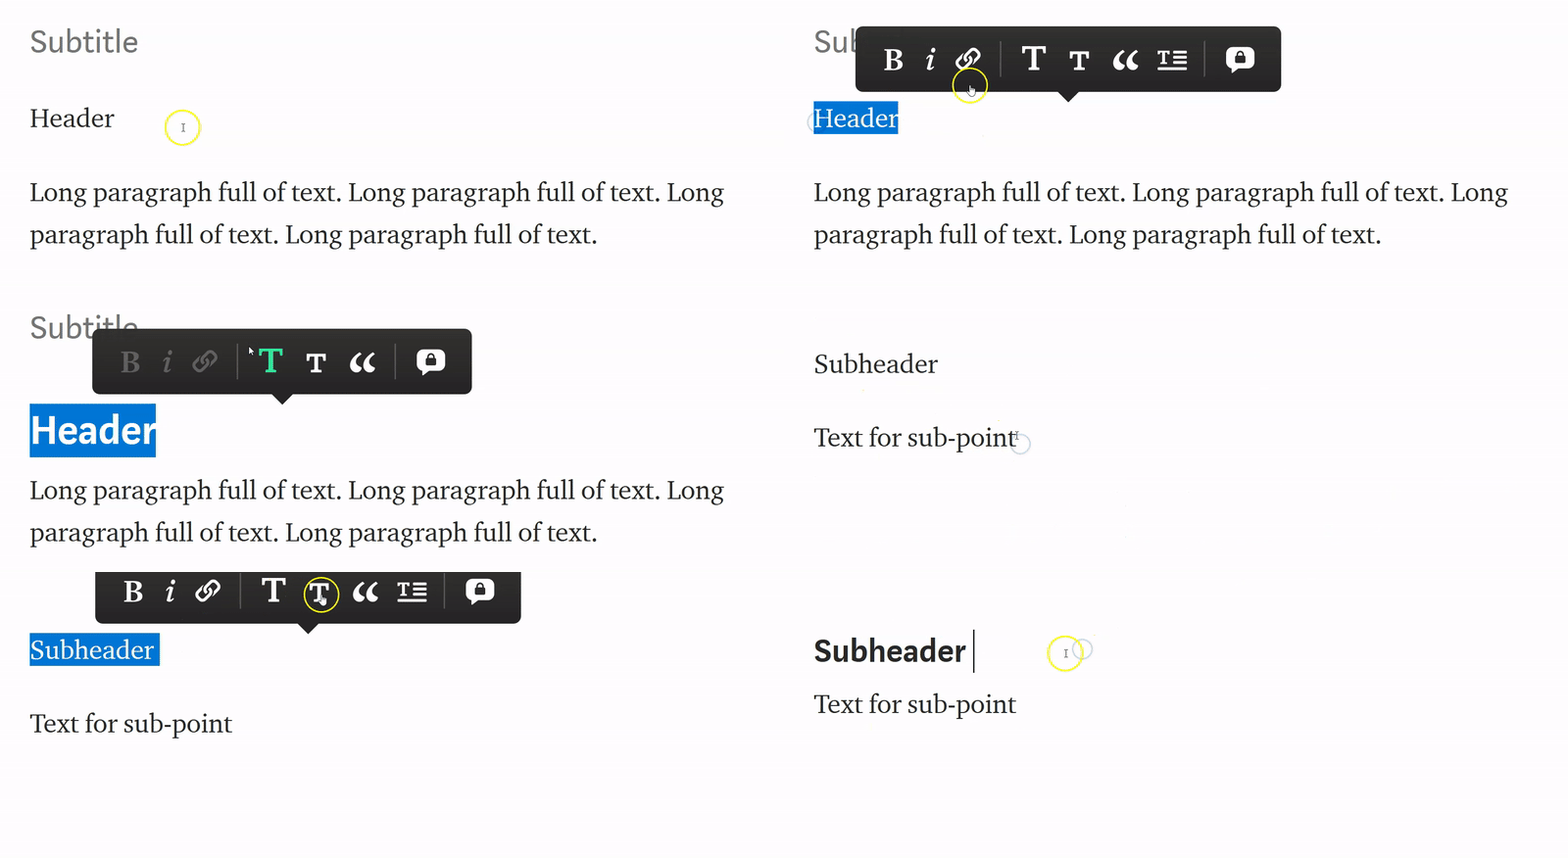
- Title: Only the first line of the story is considered the title. Select the text and click the large “T” icon to format the title. It can be any length, and is bound by hitting “return” on your keyboard.
- Subtitle: Writing directly below the title is considered the subtitle. Select the text and click the small “T” icon to format the subtitle. It can be any length, and is bound by hitting “return” on your keyboard.


For more information on Medium Title and Subtitles, read:
- Headers: To set a header, select any text that isn’t the title or subtitle and click the large “T” icon.
- Subheaders: To set a subheader, select any text that isn’t the title or subtitle and click the small “T” icon.

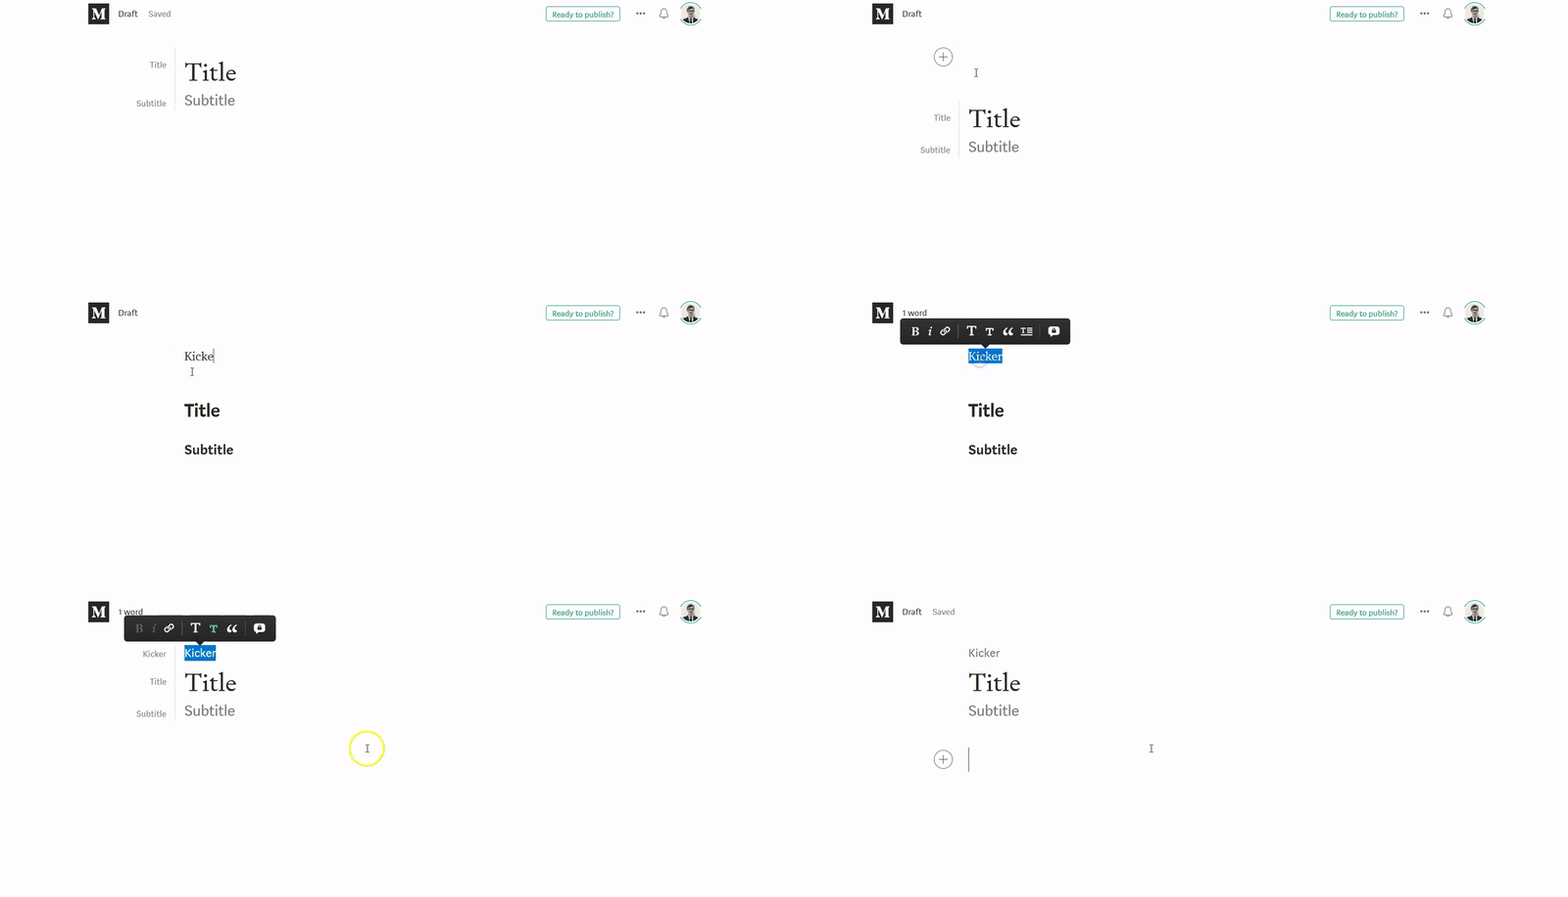
- Kicker: Creating a “Kicker” is slightly more confusing. My suggestions would be to start with a formatted title and subtitle. Next, using the example seen below, click in front of the the letter “T” in the word “Title” and click enter, creating a new line. Now type the text for your kicker on the top line (which should be blank). Highlight your kicker and click on the lowercase t icon. This is demonstrated below:

For more information on Medium’s Kicker, read:
Quotes
Select any text in the editor and click on the quote icon (“) in the menu to make it a block quote. Click the icon again (second time) to make it a pull quote. Clicking the quote icon a third time will remove the quote formatting.


Tip: Block quotes (pressing the quotation mark button once) are typically used on Medium for longer direct quotes. Pull quotes (pressing the quotation mark button twice)are typically used for short direct quotes. Pull quotes can also be used to emphasize key points in an article.
For more information on Medium Quotes, read:
Drop Caps
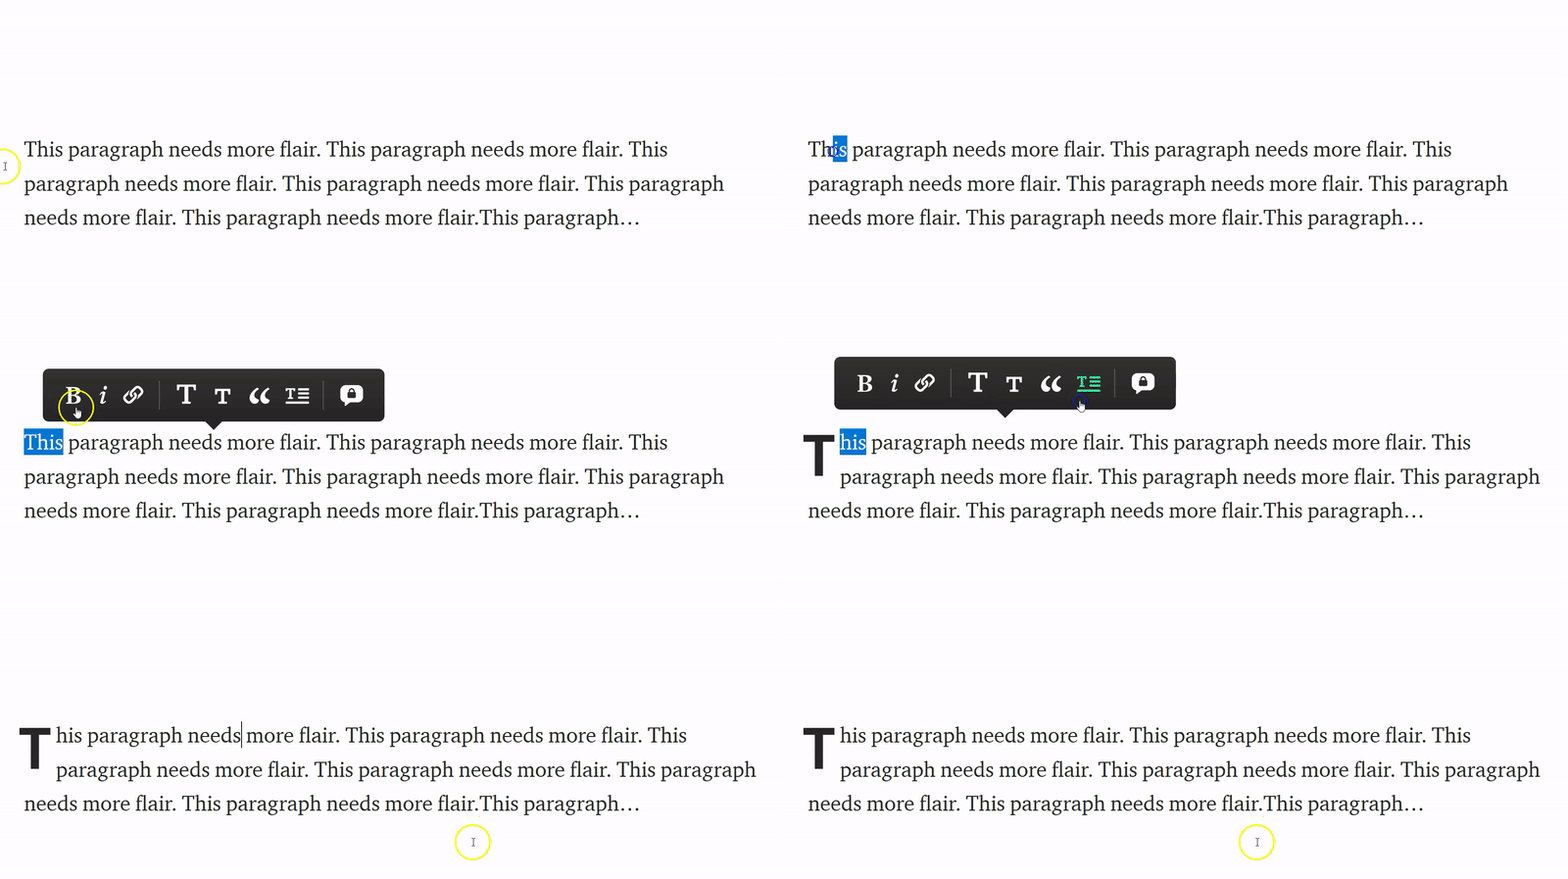
Select the first letter of a paragraph, and an option to turn it into a drop cap will appear in your formatting menu.

Custom Image Drop Caps
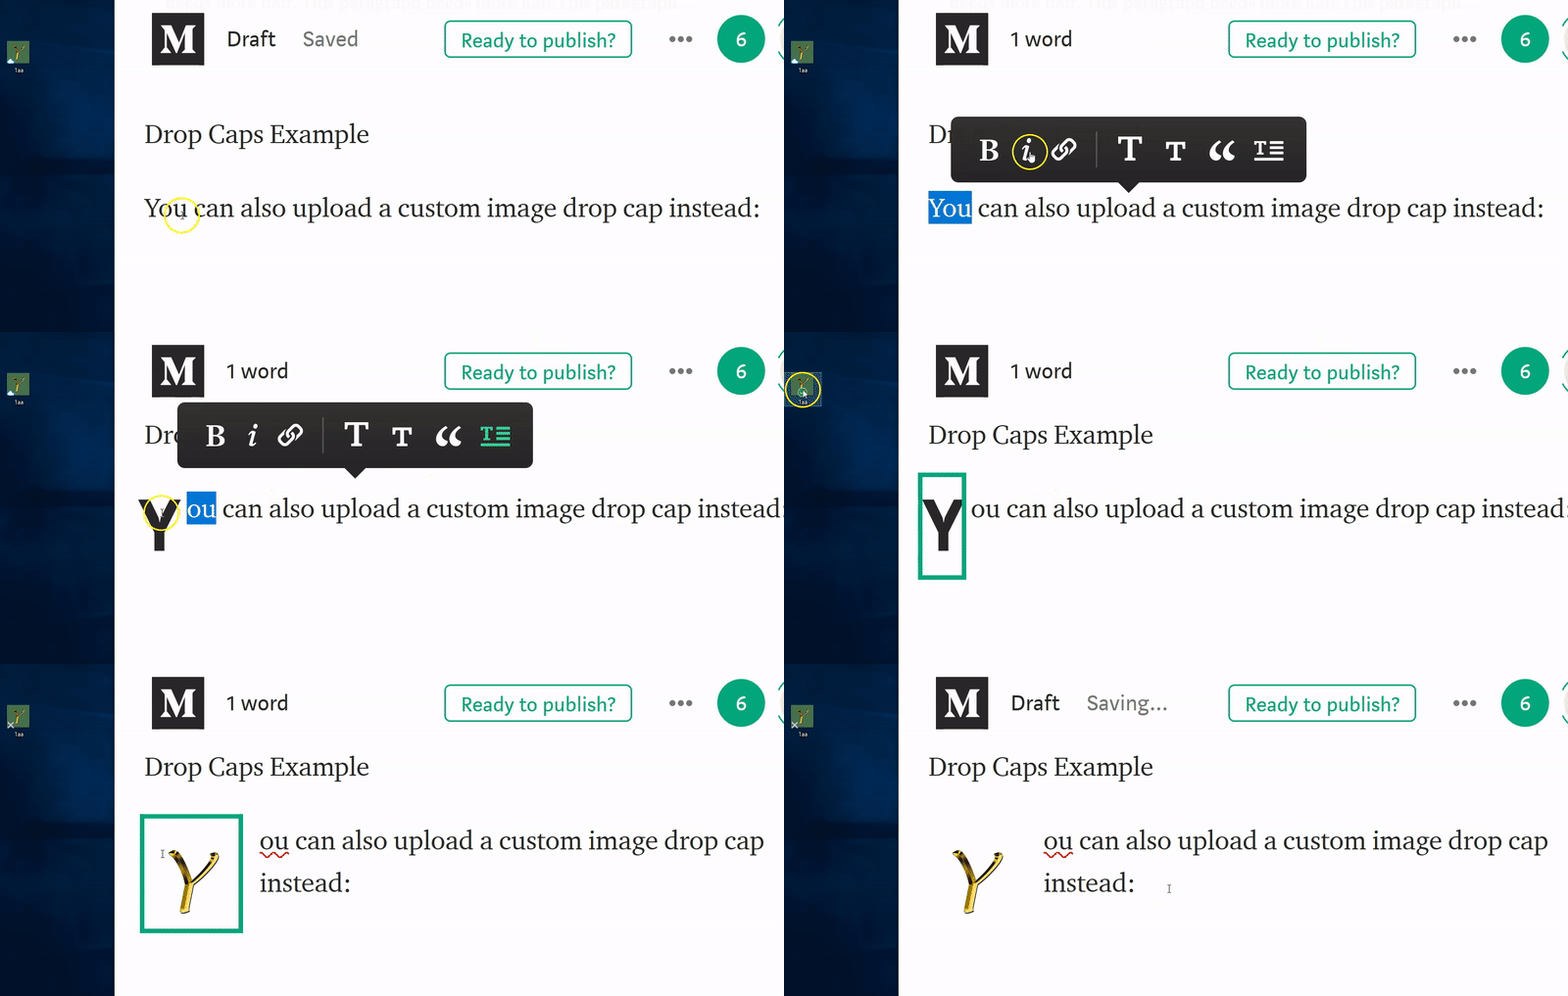
You can also upload a custom image drop cap instead of the Medium default characters.
How to Create a Custom Drop Caps Character
- Follow the steps above to create a standard drop caps character.
- Save the custom image you want to use for your custom drop caps character to your desktop.
- Click on the standard drop caps character (you should see a green rectangle appear around the large letter).
- From your desktop, drag the custom image file you’d like to use in place of your drop cap, directly onto the green box.
- The custom image will replace the default drop caps character.

For more information on Medium Drop Caps, read:
Leaving Private Notes
On a draft or a published post, select the text you want to comment on. Click the lock icon from the pop-up toolbar. Write your note. If you do not see this option in the toolbar, it is because the author has turned off private notes.
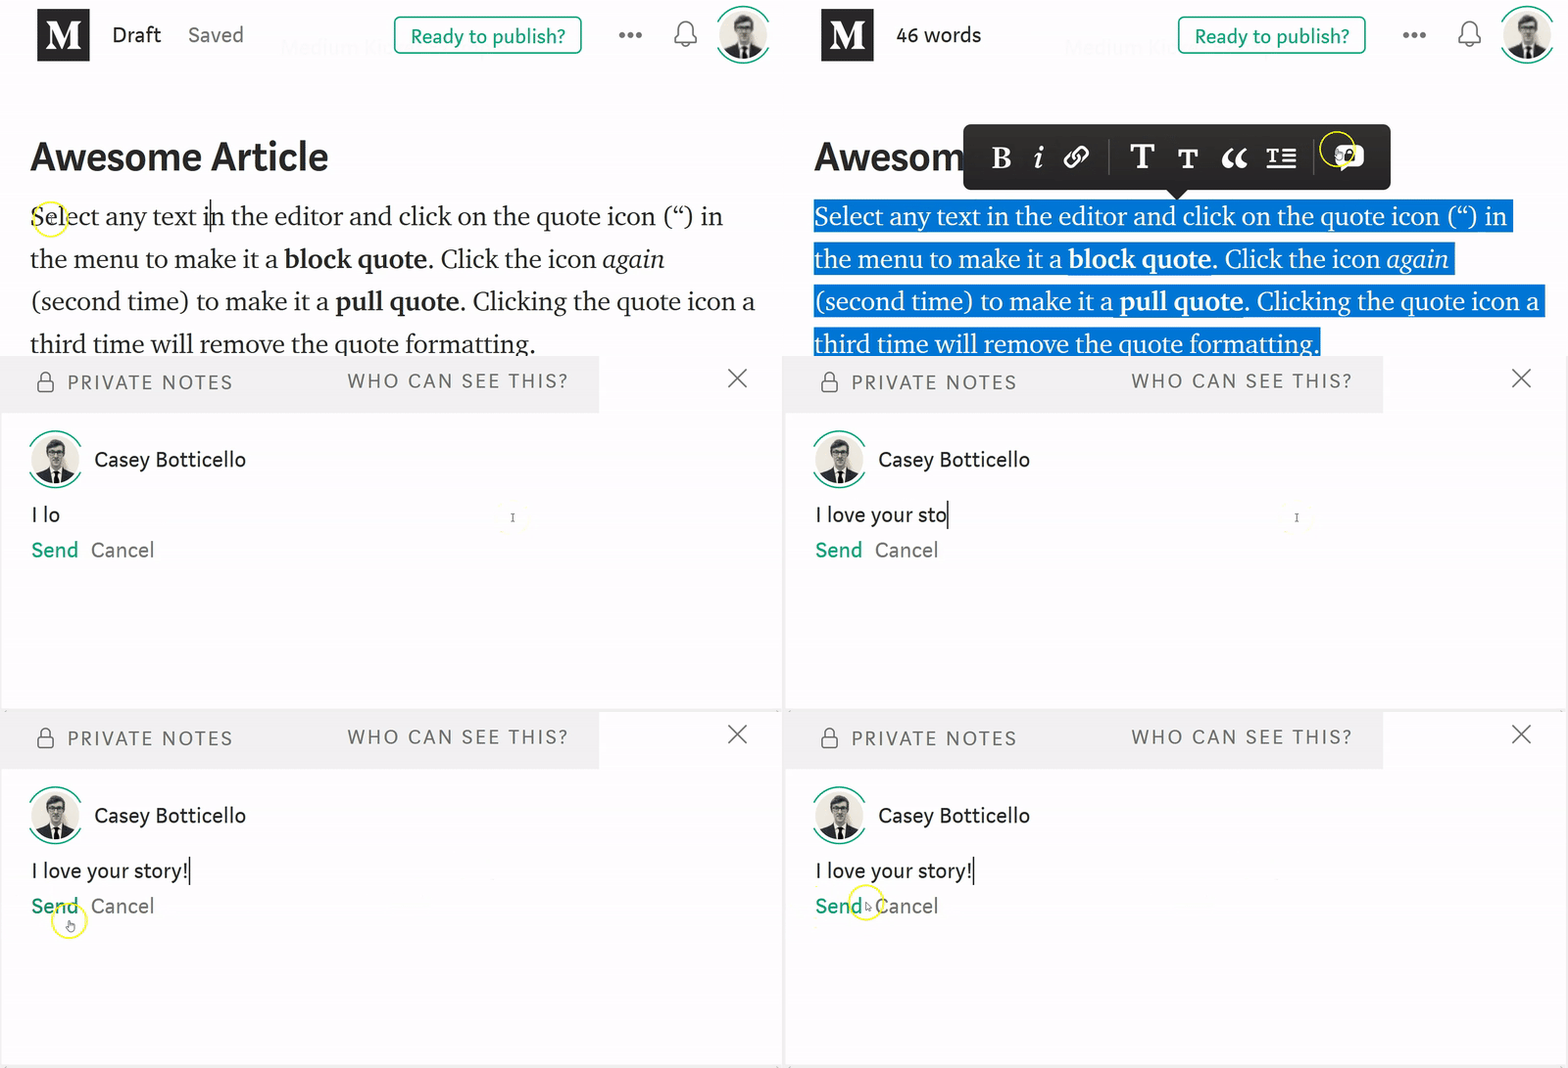

Tip: When you leave a note, it will be visible to you, the author of the post, and if the post is in a publication, the editors of the publication will also be able to see the note.
Additional Medium Article Formatting Tools


Only some of the more basic formatting tools are in the pop up text toolbar, as described in the sections above. Many of the other formatting tricks either require keyboard shortcuts or use of various custom Medium settings (bulleted lists, custom URLs, custom meta descriptions, and most image formatting, to name a few), as demonstrated below.
Keyboard Shortcuts in the Editor
If you forget the keyboard shortcuts for Medium’s editor, don’t worry. Press Ctrl+? (Desktop) or ⌘+? (iOS) while editing an article to see the list of keyboard shortcuts.


Creating Lists
Bullet Points — To begin a bulleted list, go to a new line, type in a dash (-) or asterisk (*), and press Space. Next, you start typing your first item. Once you hit Enter on your keyboard, the list will be reformatted for you automatically:

Numbered List — To begin a numbered list, go to a new line, type in 1. (numeral one, period), and press the space bar on your keyboard. The list will automatically add subsequent numbers when you hit Enter on the keyboard.


Tip: Numbered lists cannot be continued if you try to insert an image in the middle of them. Alternatively, you can create numbered lists without using Medium's formatting (so that you can include images, for example)by excluding the space from after the period.
Friend Link
One of the most overlooked features available to all Medium writers is the friend link. Medium’s friend link gives anyone free access to your story — even if they’re not a subscribing Medium member or they have already read all their complimentary stories for the month.
To Utilize Medium’s Friend Link:
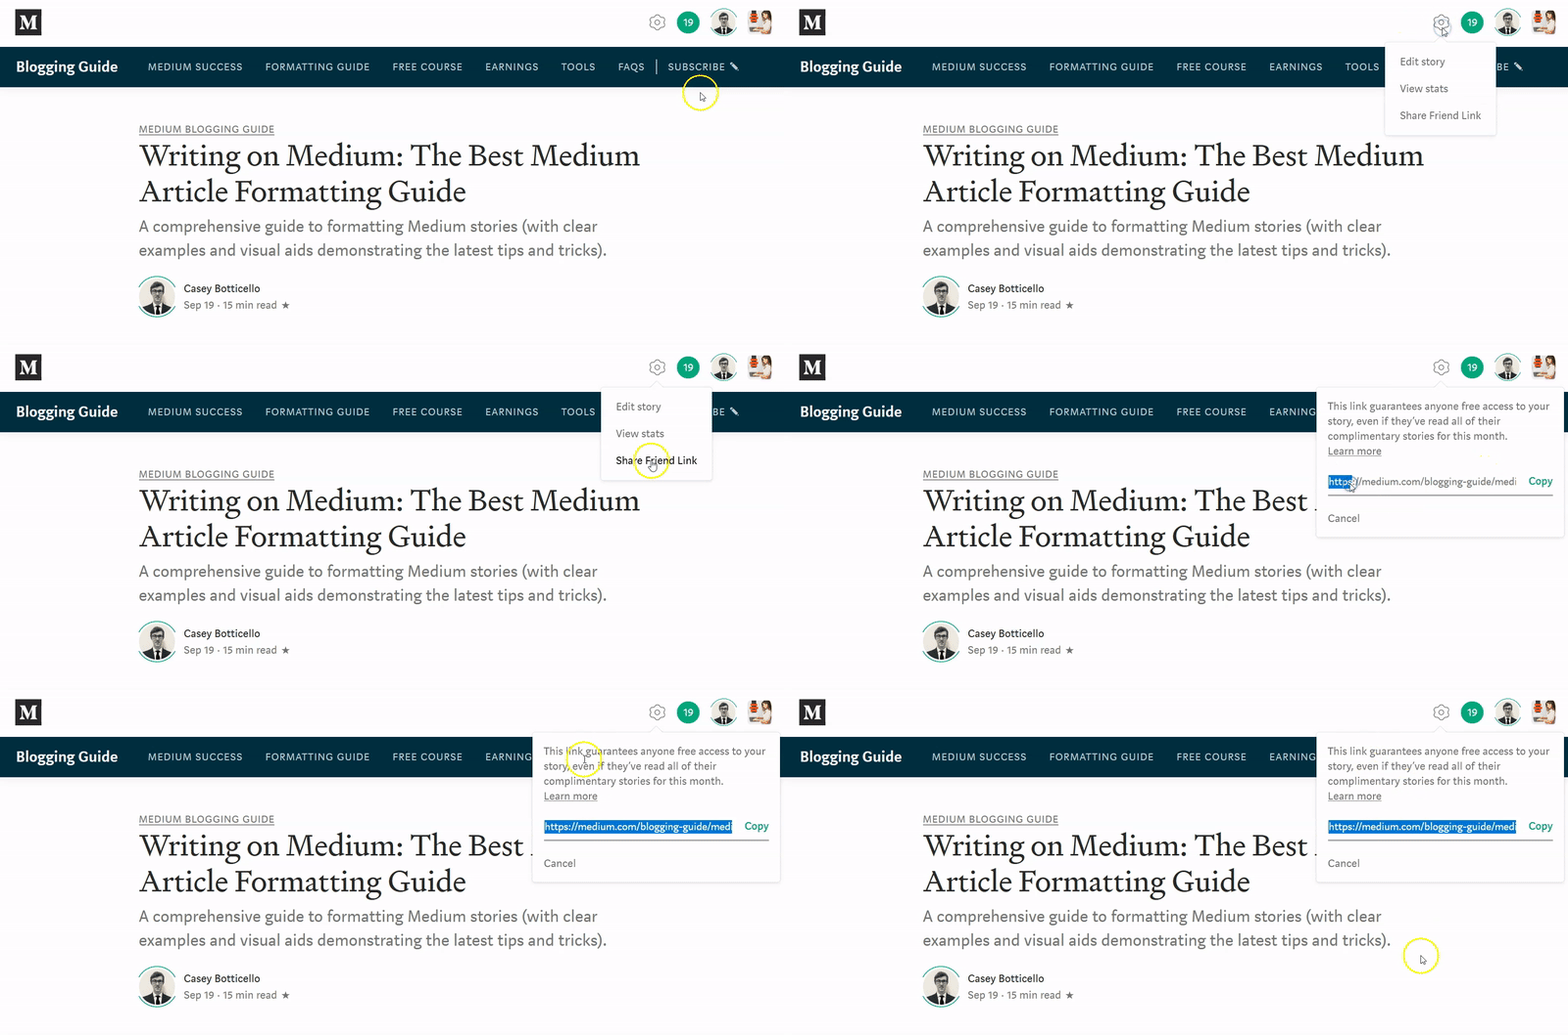
- Go to the article you want to share
- Click Edit in the top right hand corner of the article
- Click “Share Friend Link”
- Copy the newly generated link, and share with friends or social media

Note: The one exception appears to be using the friend link on Medium itself. For example, if you post the friend link to a related article in another article, this link will revert to the standard pay-walled link.
But outside of Medium (on Facebook, Twitter, LinkedIn, or any other platform) you are able to share your article with anyone, for free!
For more information on Medium’s friend link, read:
Medium Scheduling Posts
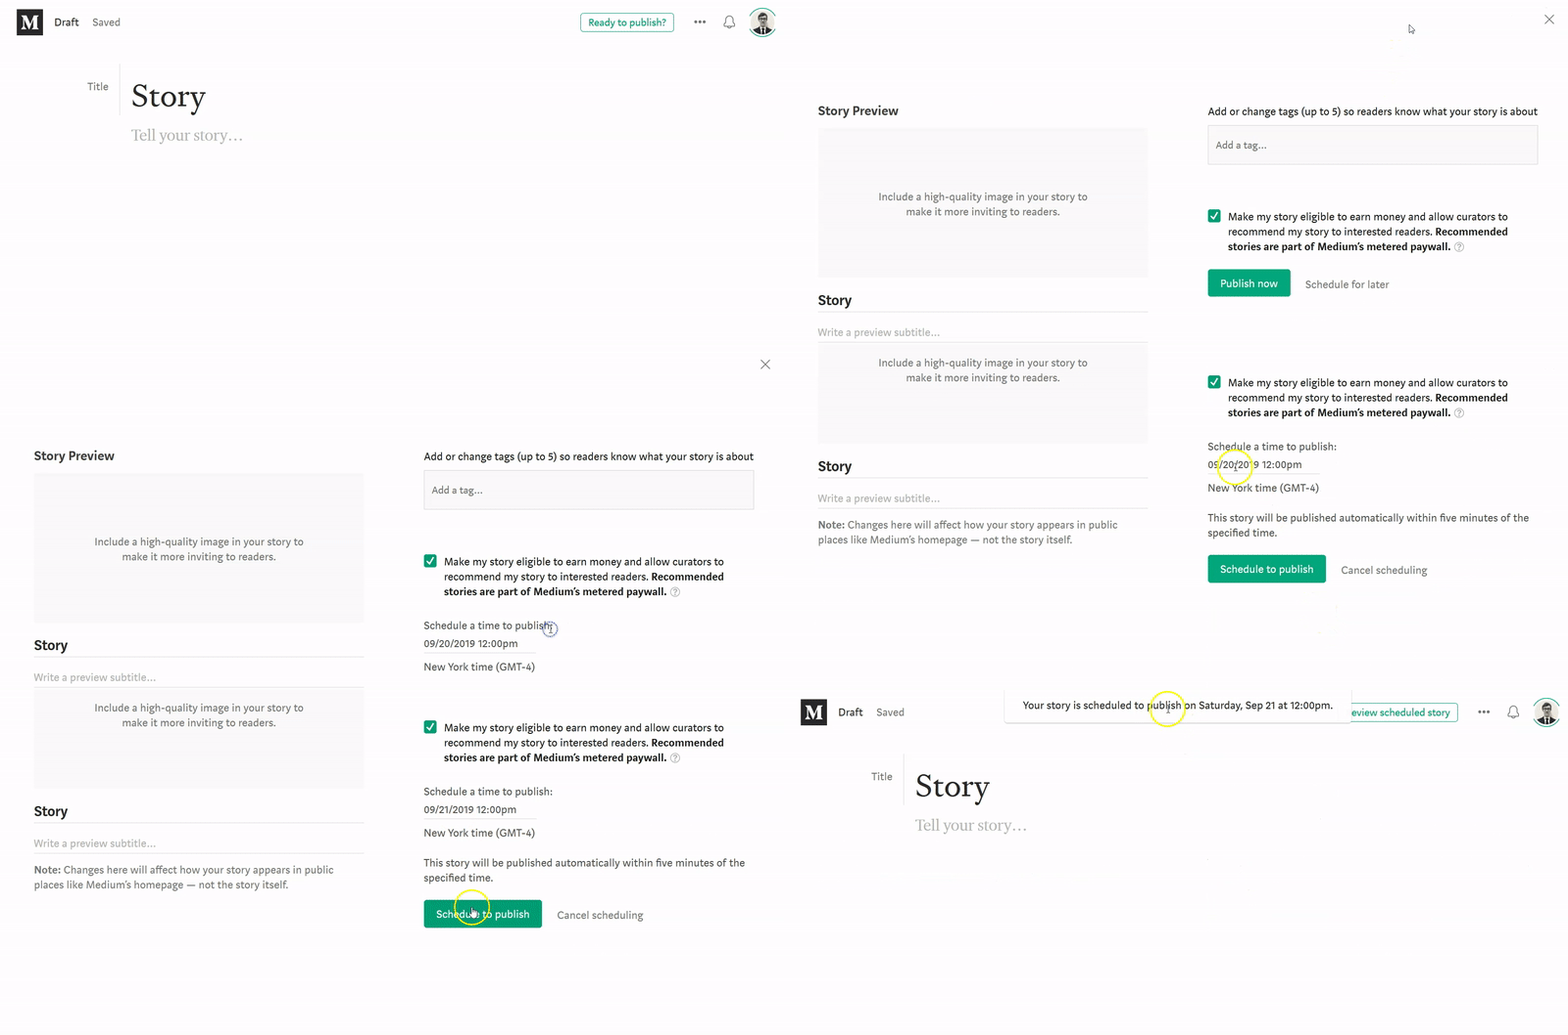
To schedule a post to be published at a particular time and date:
- Go to the draft you want to schedule to publish and click Ready to publish?
- Click Schedule for later.
- Enter the date and time when you wish to publish.
- Click Schedule to publish.

For more information on scheduling Medium posts, read:


